

How To Shoot In Manual Mode
This essay is for amateurs who accept been shooting a while and feel the desire to push the envelope past going to transmission style. For those who are dedicated auto shooters and never want to change, I respect and endorse your choice, and wish you all the good shooting in the world. But this essay is not for yous, so you need non read whatsoever further. Why go manual way? Well, there are some very good reasons to practise so. I believe that all the fun is in manual shooting, and I besides believe that you tin unleash your creativity past shooting manual.
I was a JPEG shooter for more than years than I should accept been, because I somehow found camera settings to exist scary. I don't know what I imagined would happen if I set up my camera file format to RAW and the dial to "M". I had a photography friend who encouraged me frequently to try the transmission mode, and I kept promising to do it but somehow never did. Until i twenty-four hour period I just did, and I never looked back. I was instantly and permanently hooked. And then if you feel that mode yourself, I take walked in those shoes and know exactly how yous experience!
The v settings that one has to master to shoot manually are:
Camera ISO, Shutter Speed, Aperture, White Balance and Metering method. Easy, right? HA! Well, in a way it is. The big thing is that yous just have to get used to those settings. You can exercise and so with some basic agreement of them and how they bear upon your photograph.
Nasim and the gang have written dozens of manufactures most all these settings, what they mean and how to employ them. These manufactures are important and if yous haven't read them, delight do so using the links beneath, as they will brand information technology easier to understand how each works individually. Also, don't forget that Photography Life has a large library of great photography tips for beginners, so if yous feel like you want to larn a lot, check all the manufactures out – there is a wealth of knowledge there.

Table of Contents
Gear up Your Photographic camera to Manual Way
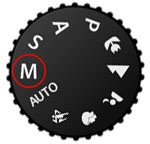 Now nosotros can leap to where to first. It's a bit like decorating your dwelling – you have to beginning somewhere. Selection a wall color, choice a carpet color, option a colour out of your furniture, and go from in that location. In photography, y'all accept to pick a setting to beginning with and all the rest become from in that location. So, to brainstorm, set your camera to Manual Fashion. It is very easy to do it. Most cameras have a "PASM" punch on elevation of the photographic camera where y'all can change your camera mode from. Merely rotate the dial to the letter "M", as shown in the picture to the left. That's all there is to it – your showtime step is accomplished!

Set Your White Residue
Adjacent, I volition assist y'all out with some background settings. These will probably non change during your shoot unless something almost your environment changes. As you get comfortable shooting in the manual manner, y'all will exist able to decide when a change is necessary. We volition start with White Balance (WB), which has to do with the color of light. Your sensor setting should friction match the color of the light that you are shooting. I volition give y'all ane to start with, merely white residual is purely a matter of personal taste. There are no wrong white residue settings. Every bit a thing of fact, as you shoot manually for a while, you will brainstorm to see the color of light yourself and will begin to know that you need to modify your WB depending on what you meet. Let me requite y'all an example of this. My sister's living room has a aureate wallpaper which made the low-cal in the room very gold colored. Every Christmas my pictures had an ugly yellow (gold) cast and I never understood why. Until one twenty-four hours I realized that my WB could impact these pictures and I figured out the right setting for yellow light, and bingo! My pictures came out looking normal.
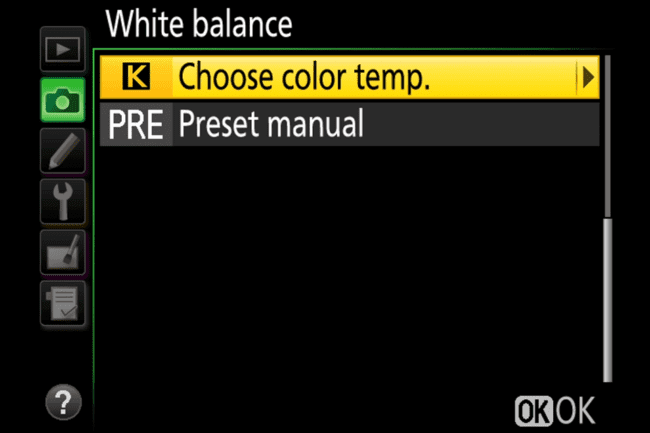
White balance is very of import, but in that location are general settings that tin can work in many usual outdoor scenarios. So set up your WB to something like 5260 (daylight) to starting time with, and every bit y'all discover whether or not yous similar that setting, yous can set it to something more to your taste. Afterward on, if y'all like your pictures to expect a little bluer, set your WB to a smaller number like 5000. If you desire to move to warmer tones, ready your WB to a larger number similar 5860. Every bit you get used to WB, you lot will start to understand it and not be intimidated by it. And every bit you use your WB settings, you will want to showtime reading all nigh it to increase your agreement, which will so brand you improve able to ready unlike white balances. If yous struggle with WB and want to sympathise it in particular, check out PL'due south excellent Understanding White Balance article for more details.
Gear up Your Metering Mode
The adjacent background setting is the Metering Way. This can likewise change during a shoot, but ordinarily you develop a favorite metering method and stick with it until circumstances phone call for a different 1. For a beginner, a nice general metering method is "Matrix" metering, which does a nice job at evaluating the whole scene and giving you fairly accurate metering readings. Nasim's commodity on Metering for Beginners volition explain all almost that and why it is a nice general method. So for now, set your metering method to "Matrix". However, if y'all adjust your settings based on your camera meter and things wait too nighttime or also bright, then you lot might demand to switch to another metering mode such equally "Spot", and then that your subject field stays properly exposed.
Camera Exposure
Now nosotros come to the not-background settings. They are the "big three": Aperture, Shutter Speed and ISO. They are all interdependent, but as I've said before, you accept to beginning somewhere, and then it becomes necessary to pick one and go from there.
Set Your Camera ISO
I am going to suggest you to get-go with your Camera ISO. You lot have to choice an ISO based on the lite conditions of where you are going to exist shooting. So, for example, take your camera and stride out the front door. Appraise the calorie-free. Is it a vivid sunny day? Is information technology a cloudy twenty-four hour period? Is information technology a dark and gloomy day? Let's say it is a bright sunny day. In that example, prepare your ISO to the lowest number, such equally ISO 100. If it is a cloudy mean solar day, y'all might demand to ready your ISO to a larger value such as ISO 400, and if information technology is a dark and gloomy day, you might need to push button ISO further to something similar ISO 800, or even ISO 1600. These are just numbers to start with until yous get the hang of ISO for yourself. If the conditions stay the same throughout your shoot, you can set your ISO and forget virtually it. So…one down.
Set up Your Aperture
Next make up one's mind on your lens Discontinuity. Do you want close-upwards pictures with those overnice blurry backgrounds with the strange proper noun of bokeh? Practise you lot want pictures that are sharp from front to back? Do yous desire something in between? Let's say you desire a closeup moving picture with nice bokeh. Set your aperture to the lowest f/ number that your camera has, such every bit f/two or f/three.5. Practise you want a prissy abrupt landscape photo? Prepare your discontinuity to f/v.6 or f/eight to start with. Do you want something in between those two? Gear up your aperture in the mid range, mayhap f/4. Yous get the idea. For now, don't try f/sixteen or smaller…withal. Instead, starting time with something like f/v.6.
Discontinuity tin can go a bit confusing for beginners, because a minor number like f/2 represents a larger aperture, whereas a large number similar f/16 represents a smaller discontinuity. Check out the aperture commodity I linked before for more than details on why this is the case.
Beingness able to control how much you have in focus is of import and yous can read about Depth of Field in more detail to understand how different variables impact your images. About importantly, don't underestimate camera to discipline altitude – that'due south the biggest variable of them all!

Set Your Shutter Speed
The third and the last of the big iii is Shutter Speed. This one should always exist set last, equally it is so dependent on the other settings. Both Photographic camera ISO and Aperture settings that you fix earlier have told your camera how much light to let in through the lens and how your camera sensor will capture it. At present you have to control that light with how fast your photographic camera shutter opens and closes when you accept the photo. When you set your camera to manual mode, your shutter speed indicator volition announced in your viewfinder equally a bunch of little vertical lines bisected with one single bigger vertical line right in the centre (some cameras will have the metering confined displayed on other sides of the viewfinder):
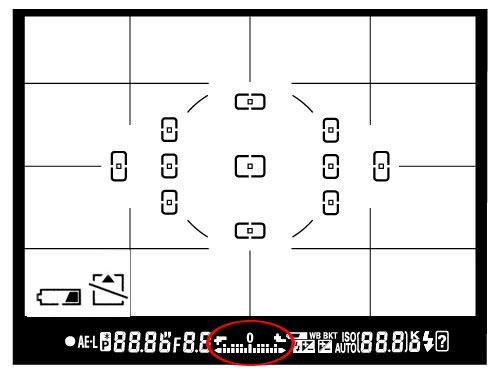
There are also trivial lights that appear that will tell yous if you are choosing an exposure that will piece of work, but for this moment we will not pay attention to that calorie-free. If y'all take read the other manufactures about shutter speed, you will know that all the fiddling lines to the left will make your picture darker, considering the shutter speeds are faster and volition restrict the light coming into the sensor. The picayune lines to the right will make your pic brighter, because the shutter speeds are slower and volition let more than light onto the sensor. What I will accept yous practise is set up your shutter speed to the heart vertical. That will requite you lot a good exposure to first with. As you practice more and more than, you will be able to decide how you desire your pictures to look and will exist able to become off the center with increasing confidence. Three consummate!
Putting it All Together
Well, here nosotros are with all the settings for your photographic camera set up for y'all to try a manual photograph. Pick a sunny day to start. To recap, we take chosen WB of 5260, Matrix Metering, ISO 100, Aperture of f/5.6, and Shutter Speed on the center vertical line. On this sunny 24-hour interval that shutter speed might read something similar 500 (technically it is ane/500 of a 2nd), but it could be larger or smaller in value. It all depends on whether you lot are shooting into shadows or brilliant light, night trees or light colors. Don't shoot into annihilation white simply yet – it is too before long. Shooting white things has a special challenge where yous might be overexposing or underexposing, so option something else to aim at.
Take a deep jiff to steady your nerves. Gear up, set, focus and shoot!
How did you practice? If yous got a terrible picture, don't despair. Digital photos don't cost anything to develop. Just endeavour again.
One more than thing. Yous should be shooting in RAW format and then that y'all can adjust your photos when you brand mistakes. If you don't take whatsoever software for post-processing, I recommend using your camera'southward own software to do your exposure corrections with (such as Capture NX-D). From at that place, you should be able to exercise basic edits, such as cropping, straightening your paradigm or tweaking colors, and convert to JPEG file format. For those who think that mail service-processing is a PITA (hurting in the a**), y'all should know that correcting mistakes in post is where all the learning happens. Post-processing makes you a better photographer. Say y'all observe yourself shooting dark all the time and constantly have to lighten your pictures. Eventually, it will dawn on you to deadening downwards your shutter speed in the photographic camera, or tweak your camera'due south ISO to make your image expect brighter. Say you go along shooting your pictures off center. Having to constantly crop your photos volition teach you to start composing pictures better. Say your pictures e'er come up out a little too bluish. You lot volition figure out through correcting your white balance in post what white residuum to effort in the camera that will exist more satisfying to your center. Post-processing is your friend and you will presently come to run across its value as a tool for yous to get the best lensman that yous can be. So please, ever shoot in RAW format and acquire to postal service-process!
This method will work. But persevere and discover the fun of shooting transmission. After a while, y'all will find that you lot have lost all your fear. All these settings will become 2d nature to yous, and you lot will get actually practiced at choosing what settings you need for whatever situation you find yourself shooting in. Only keep on shooting and don't end. And have FUN! Before you know information technology yous will finish thinking of yourself equally an amateur and start thinking of yourself as an advanced photographer, or a semi-pro and maybe even someday a pro!
Good deal!

Source: https://photographylife.com/manual-mode-photography
Posted by: daughtreymuchey.blogspot.com
0 Response to "How To Shoot In Manual Mode"
Post a Comment